

You’ll need a package of raffia, twist ties, and scarlet thread or yarn, scissors and glue.

Separate a small to medium bunch of raffia from the rest of the package. Tie it tightly in the middle of the bunch. This will form the head and body of the angel. Set it aside for the moment.

Take another small bunch of raffia and use a twist tie to hold it together on one end, leaving a bit fluffed at the end. Braid the raffia for several inches. This piece will form the arms and hands, so the length will kind of depend on the size of the angel. Measure it against the “body” of the original bunch. The arms will go around and in front. When you reach the length you desire, use a second twist tie to temporarily hold the braid and cut off the extra raffia. Be sure to leave another bit hanging to give the impression of the hand.

Use the red thread or yarn to wrap the “wrists” and then remove the twist ties. Move the knot to the bottom of the wrists and trim closely. Put a dot of white glue on the knot to help hold it. Set the arm piece aside for the moment.

Take another small bunch of raffia and again tie it off in the middle. This piece will form the wings of the angel.

Separate each side of the wings into four smaller bunches. Do this between your fingers.

Smooth the raffia around your fingers to form the shape of the wing and use the twist tie to hold it temporarily. Repeat on the other side and fuss a little to make both side even with each other. Then use the red thread or yarn as you did with the arm piece to wrap and tie off the ends.

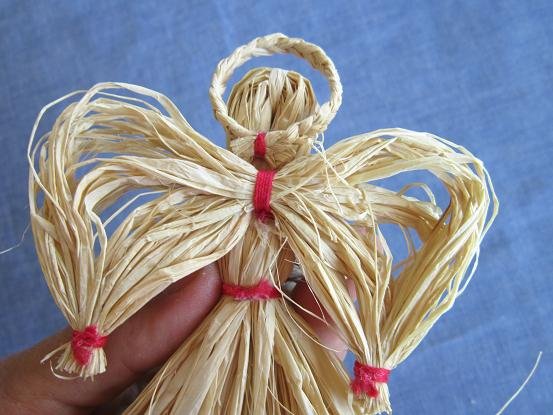
With the knot underneath, fold the original body piece in half and tie around the neck to form a head for your angel. Make a second braided piece and tie in a circle to form a small halo. You should now have each of the pieces shown in the photo: a loose body with a head, a braided arm piece, wings and a halo.

Take the body piece and separate the raffia just under the head and slip the braided arm piece through the separation.

Smooth the raffia around and underneath the arms and tie off a waist.
Braid a length of thread or yarn to make a hanger. Fold it in half and glue it to the back of the head. Glue the halo to the back of the head also, on top of the knot of the hanger. Then glue the wings at the base of the neck.

Bring the arms together at the wrists and glue them. Fluff the skirt at bit and you are finished.
I love this tutorial. We made them from corn stalks one year, but haven't tried raffia. Thank you.
ReplyDelete